The Space between

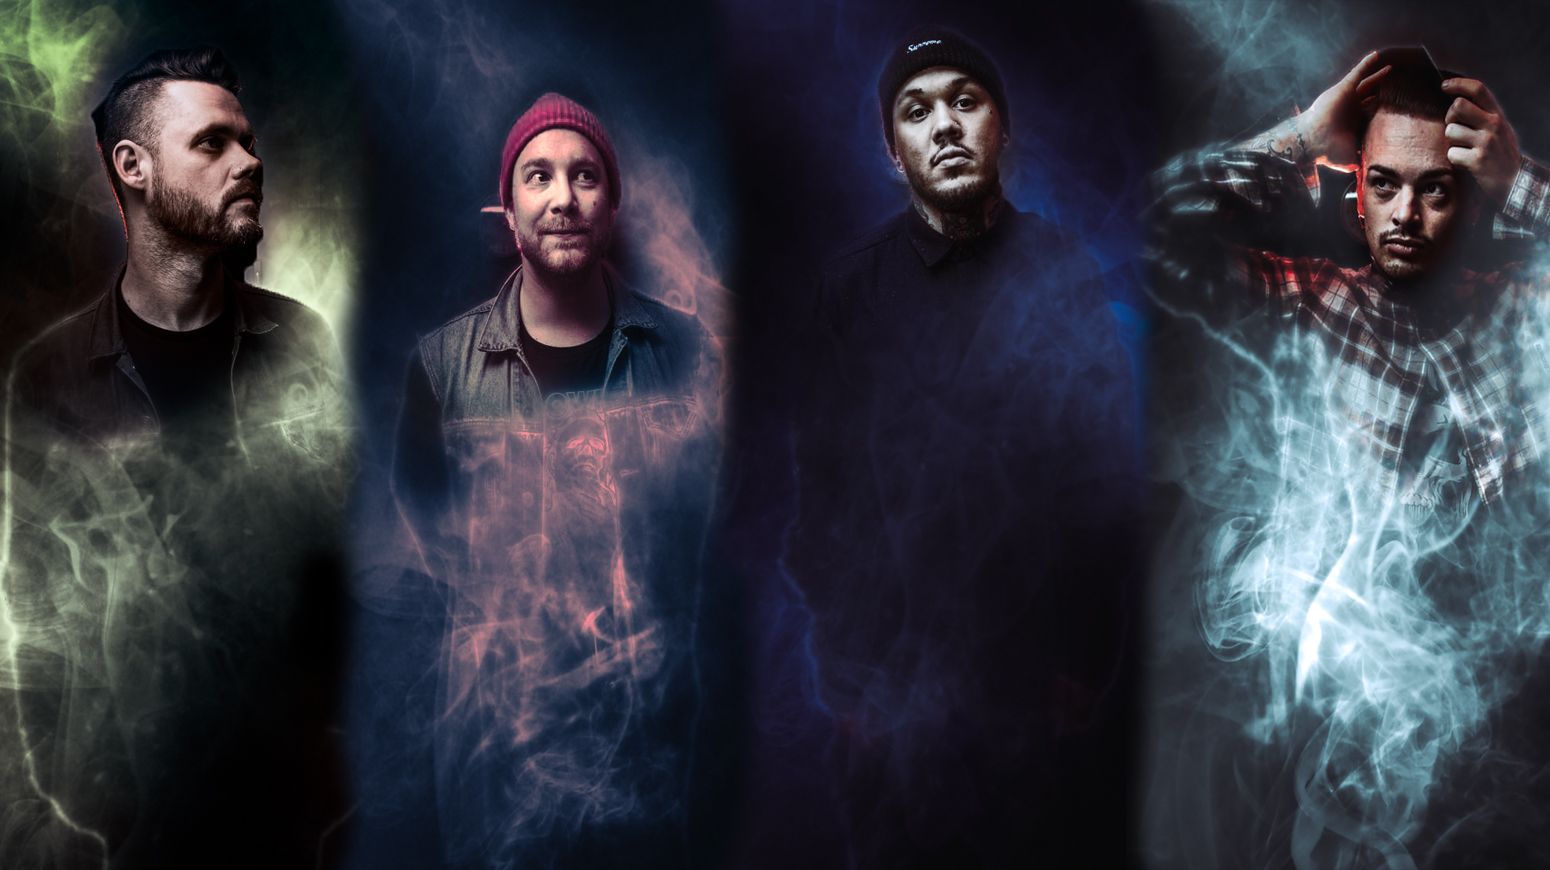
In photography standing out from the millions of photographers is near impossible nowadays. Everyone and their mum is a photographer.  You have to do something different. 

I then searched the web and was seeing great photos but mainly nighttime landscapes. Though they were taken up very tall buildings and well that's not for me. The photos produced look amazing but the portraits were all the same. I get it if you're selling an object and you have a model you don't want some crazy colours distracting from the product. 

I thought I'd try some effects on my portraits and see what happens. The response has been good, I've gotten about 100 new Instagram followers, which I know isn't a lot nowadays but it’s a start. 

I think the new style stands out more and is something that I'll keep doing for now.

Why use Photoshop?

Adobe Photoshop is the tool in your camera bag you don’t bring with you.

Before taking any photographs go into your camera settings and make sure you’re shooting in RAW. RAW is a file format that captures all the image data recorded by the sensor, not like Jpeg, which is compressed. Raw gives you the best quality and with the Adobe cc, you can take a photo you thought wasn’t exposed correctly and bring back what you thought was lost.

RAW setting on a canon camera

RAW setting on a canon camera

Be organised with your photographs. Keeping your photos organised is very important, each digital photograph there will an imprint of metadata, this is the RAW information about the photograph. Depending on your camera you will have, shutter speed, aperture ISO, lens and focal length and sometimes location the image was taken. In Lightroom, you can create collections. Collections pretty much are an album, label the collection and drag and drop the photos you wish to be apart of that collection keeping your photo organised.

Before Lightroom

Before Lightroom

After Lightroom

After Lightroom

Before Lightroom and Photoshop

Before Lightroom and Photoshop

After Lightroom and Photoshop

After Lightroom and Photoshop

Straight from Camera

Straight from Camera

After edit

After edit

Be Creative

You can be very creative with photography, either in-camera or in post. Long exposures, double exposures, light painting. They are the kind of things you can do in-camera. in post you can do all that in theory and then some. 

This is both light painting and long exposure. Very simple really, just make sure your camera is on a tripod the room is dark. With a touch while the shutter is open light paint. Going over areas you want to stand out more. 

_R9A5155-Edit.jpg

Shot with flash and low ambient light to bring out the subject. I then moved the image into Photoshop and edited in the sparkle effect. You can do sparkles in the camera but that would mean doing a long exposure and overexposing the subject, not the look I was going for. 

In photoshop you can create actions and even purchased action from the website. This image was created by using an image from Unslash.com and the Energy action by Seven Style. You can see and buy more actions by Seven styles by clicking here. With all actions, you can tweak them to your own style, add things and so on. 

Photoshop has changed photography for the better. Be it removing spots to doing extreme things like above. The best photographers now days must be good at photoshop. 

state-of-it.jpg
thunder-lake.jpg
pink-glow-IG-FB.jpg
Dragon-london.jpg

Watch photography

Now-a-days if you want to tell the time you'd look at your phone. The smart phone has changed everything from taking photos, filming videos, browsing the internet and telling the time and so on. Well, people still wear watches, and people still pay crazy sums of money for them. As a person who doesn't wear a watch but is still fascinated by the repair process, Jewellery and Watch photography are on the same line. They are both small products that need good eye catching images to sell. The more detail in a photo of a watch can definitely increase the potential of selling the item. 

The best way to shoot a watch is on a photography table, having a main light and then a few other lights to pull out the detail. Always find out what background the client wants first. In each shot you need to highlight the brand, making sure it is visible and if you need an extra bit of light and don't have any more lights, then you can use a reflector and if you don't have reflectors a white card will work nearly just as well. All product photographers have white card. It's something you'll use for the first time and think why wasn't I using this all the time. Like all products you photograph you should always focus stack the images. You can use Helicon focus or photoshop. I recommend Helicon Focus. 

I took some shots of a watch repairer, or horologist, to use the proper term. 

A guide to editing Jewellery

So you've been asked to photograph some Jewellery. Firstly you need to know what background the client wants the item on. White, Black and so on. You'd then need to shoot the item making it look the best you can. The diamonds need to sparkle, you don't want a reflection of your camera and tripod in the item, so make sure you shoot the item correctly. I'll go into shooting jewellery in more depth in the future. 

Now the item is shot but the background isn't pure white. What do you do? Firstly take the image into photoshop. Create a new copy of the image in a new layer, on mack thats cmd and J. Once on you have your new layer make sure that the correct layer is selected. 

Screenshot 2017-05-18 12.04.17.png

With this image above, I wanted one part of the necklace, so with the pen tool you cut out your item. The pen tool is very tricky to use if you don't know how, I'm still trying to figure it out now. If you can't get to grips with it you can use the quick selection tool by pressing W on a mac keyboard. The quick selection tool is great but not a precise as the pen tool so make sure you check the area you want to cut out is selected correctly before the next step. 

Once the item is selected again create a new layer via copy so cmd J on the keyboard. This will cut your selected item out and put it on a new layer. 

This image is an example and not cut out correctly 

This image is an example and not cut out correctly 

Screenshot 2017-05-18 12.16.21.png

Then, make sure the layer below is selected and create a new blank layer. Once that is open and selected press shift and F5 giving you the Fill box. Make sure the fill content is White and mode is normal and the opacity is 100% then click ok. 

Once that is done turn on your above layer. The cut out image, if you've cut it out correctly, should end up with your item on a pure white background. 

You'll know its pure white by picking the eyedropper tool and selecting any part that is white and if the # is #ffffff then its pure white 

Layer mask 

Layer mask 

Once that's done, you can create a reflection. This is achieved by copying the original cut out and going to EDIT in the menu bar and clicking transform. In the transform section, selecting Flip Vertical. You would then, whilst holding the shift key drag the second image below allowing the two bass parts to just about meet. Once they meet you would go back to the layers panel and create a layer mask.

You would then choose the gradient tool, and from there pick the Foreground to Transparent mode. Whilst on your new layer you would drag up. This will softly blend away, giving the impression of a reflection. 

Once this is all done you can perform the normal editing changing levels and brightness of your item and maybe some colour correction. Though if you have shot the image correctly you wouldn't have much to do.

I hope this helps anyone trying to reach these types of results.